
 how-to
Thumb Pick Fitting Guide for Musicians: Sizing & Adjusting
Table of Contents
- Why Thumb Pick Fitting Matters for Your Playing
- How to Choose the Right Thumb Pick Size
- How to Adjust a Thumb Pick Strap for a Secure Fit
- Hot Water Molding: Shaping Plastic and Tortoise Shell Picks Safely
- Developing a Universal Picking Technique with Crossover Picks
- Reducing Hand Fatigue While Playing Guitar: Ergonomic Fitting Tips
- Visual Fitting Checklist and Common Mistakes to Avoid
- Conclusion
- Frequently Asked Questions
Last Updated: September 24, 2026
Why Thumb Pick Fitting Matters for Your Playing
A thumb pick that fits poorly will fight you on every note. If it spins, slips, or digs into your thumb joint, your right hand never relaxes, and your picking stays tense and uneven. This thumb pick fitting guide for musicians walks through sizing, strap adjustment, and safe hot water molding so your pick becomes an extension of your hand rather than an obstacle.
How to Choose the Right Thumb Pick Size
The right size wraps your thumb snugly with no pinching and no gap at the tip. If you can slide the pick off by shaking your hand, it's too big. If your thumbnail turns white, it's too small.
Using a Size Chart and Measuring Your Thumb
Measure the widest part of your thumb, just above the joint, with a soft tape or a strip of paper. Compare that number in millimeters to the maker's size chart. Most players land in a medium, but don't assume.
- Measure in the evening, when your thumb is at its largest
- Measure both thumbs if you play left-handed or use a wrap-around style
- Write the number down and keep it in your case
Accounting for Thumb Shape and Joint Anatomy
Two players with identical measurements can need different picks. A thumb with a pronounced knuckle needs a strap that sits above the joint, not across it. A tapered thumb needs more strap wrap to avoid slippage.
How to Adjust a Thumb Pick Strap for a Secure Fit
Strap tension is the single biggest variable in thumb pick comfort, and most players get it wrong in the same direction: too tight. The goal is even, light contact around the base of the thumbnail, enough to resist rotation during a hard strum, not enough to compress the tissue.
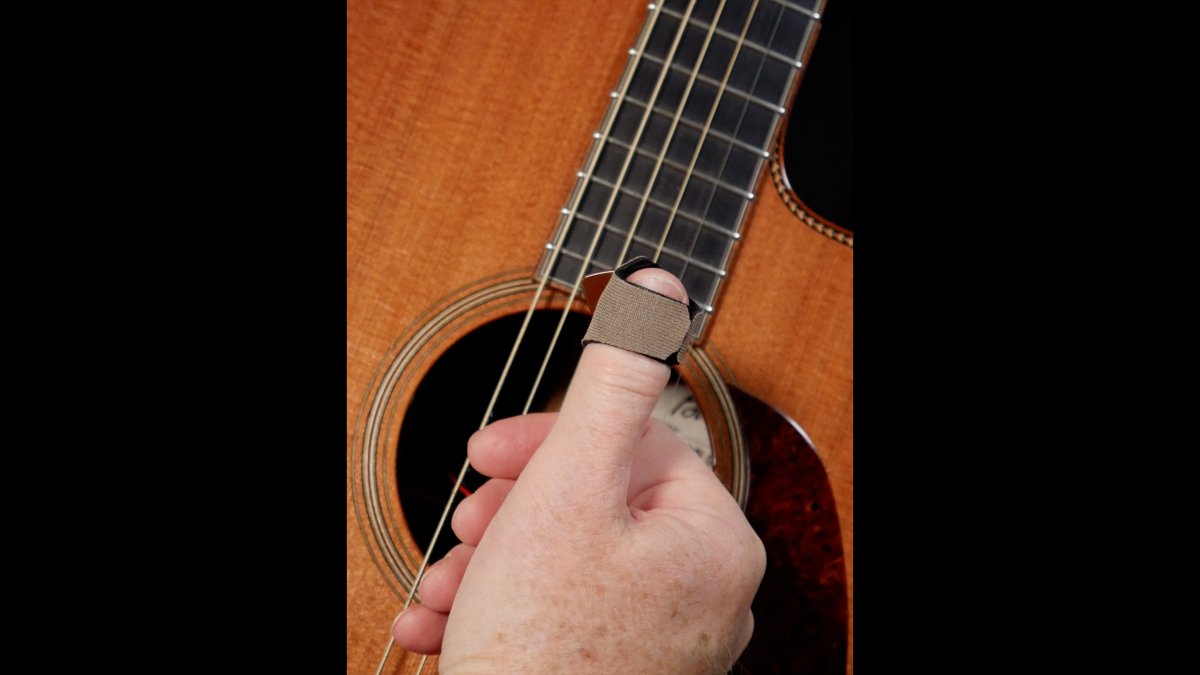
Guitarist adjusting the strap on a Crossover thumb pick for a secure thumb pick fitting while holding an acoustic guitar.
Why Thumb Anatomy Changes the Adjustment
A strap that works on one player's thumb can fail on another's even at the same circumference. Three anatomical variables matter most:
- Knuckle prominence. If your thumb has a pronounced interphalangeal joint, the strap must sit above the joint (closer to the tip) or below it (closer to the base). Sitting directly across the joint creates a pressure point that worsens with every bend.
- Nail bed shape. A flat nail bed gives the blade a stable platform. A rounded or domed nail bed lets the blade rock side to side, so those players need slightly more strap wrap to stabilize the blade angle.
- Taper rate. A thumb that narrows sharply toward the tip will let a fixed-size pick slide forward. A fully adjustable strap system compensates by adding wrap where the taper is steepest.
The Adjustment Sequence
- Loosen the strap fully before sliding the pick on, never force it over the thumb.
- Seat the blade over your thumbnail at a slight downward angle, roughly 10-20 degrees toward the strings.
- Tighten in small increments, testing grip after each one.
- Strum a full chord pattern, then check for rotation.
- Mark your setting (a dot of nail polish on the strap end works) so you can repeat it.
Reading the Fit: A Diagnostic Checklist
Use these signals to diagnose whether your strap is too loose, too tight, or correctly set. This is the check most guides skip.
Signal | What It Means | Fix |
|---|---|---|
Pick rotates during strumming | Too loose | Tighten one increment |
Thumbnail turns white or pale | Too tight, circulation restricted | Loosen immediately |
Red mark or dent after 10 minutes | Pressure point | Reposition strap above or below the joint |
Blade rocks side to side | Insufficient wrap for nail shape | Add wrap or adjust blade angle |
Tingling or numbness in thumb | Nerve compression | Loosen and rest; do not play through it |
Pick slides forward toward tip | Taper not compensated | Increase wrap near the tip |
Hot Water Molding: Shaping Plastic and Tortoise Shell Picks Safely
Hot water molding softens a plastic pick so you can bend the band to match your thumb. The technique works, but the margin between "flexible" and "ruined" is narrow, and it varies by material. Most guides tell you to "dip it in hot water" without telling you what temperature, for how long, or which plastics should never be molded at all. This section fills that gap.
The Safe Molding Process
- Heat water to just below a simmer, small bubbles forming on the bottom of the pot, not a rolling boil. Remove it from the heat.
- Dip only the band, never the blade, for 5-10 seconds.
- Lift the pick out and test flexibility by pressing the band gently with your fingers. It should give slightly, not fold.
- Bend slowly to match your thumb shape. Work in small increments.
- Hold the new shape under cool running water for 10-15 seconds to set it.
Repeat in short dips rather than one long soak. Plastic goes from flexible to ruined quickly, and once a band has been over-softened it tends to sag rather than hold its new shape.
Material-Specific Heat Sensitivity Guide
Not every material reacts the same way. The table below reflects the general behavior most practitioners observe; when in doubt, start with a shorter dip and a lower temperature.
Buy Now at our secure ETSY SHOP music store →
Material | Heat Response | Safe Approach | Watch For |
|---|---|---|---|
Standard plastic (polystyrene-type) | Softens quickly, low tolerance | 5-second dips, cool-water set | Over-bending; band sags permanently |
Tortoise shell and natural materials | Softens at lower temperatures than most plastics | Brief dips only, immediate cool-water set | Discoloration, warping, surface crazing |
Nylon blends | Moderate softening, slower response | Longer warm soak (15-20 seconds) | Slow spring-back, shape may drift overnight |
Delrin-style (acetal) | Stiff, resists heat, high tolerance | Minimal molding needed; often none | Cracking if forced while cool |
Celluloid-based | Softens readily | Hot water only, never open flame | Flammability; keep away from any ignition source |
Why Temperature Control Matters More Than Time
Water that is too hot for the material is the most common cause of ruined picks. A rolling boil can exceed the softening threshold of thin celluloid or natural materials in seconds, causing the band to deform unevenly or the surface to cloud. Water that is too cool simply won't soften the band enough, and forcing a cold pick to bend will crack it along the grain.
Developing a Universal Picking Technique with Crossover Picks
A Universal Picking Technique is the ability to move between fingerstyle, flat-picking, and hybrid picking without changing gear or hand position. That's the whole point of a Crossover thumb pick.
Reducing Hand Fatigue While Playing Guitar: Ergonomic Fitting Tips
Reducing hand fatigue while playing guitar starts with fit, not with playing less. A pick that requires constant grip correction forces your thumb and forearm to work overtime. Fix the fit, and much of that tension disappears.
- Keep the strap snug but never tight
- Let the pick rest on the thumb, don't clamp it
- Take a 30-second hand break between songs
- Watch for numbness or tingling and loosen the strap if it appears
Visual Fitting Checklist and Common Mistakes to Avoid
Run this checklist before every practice session or gig. It takes under a minute and prevents most fit problems.
- Strap sits at the base of the thumbnail, not over the joint
- No white marks or pinching on the thumb
- Pick holds position through a full strum pattern
- Blade angle points slightly down toward the strings
- No rotation after two minutes of playing
- Hand stays relaxed during fast passages
Common mistakes:
- Buying by size alone and ignoring thumb shape
- Over-tightening the strap for a "secure" feel
- Skipping the warm-up test before a performance
- Molding a pick with too much heat in one dip
- Ignoring early signs of numbness or tingling
Conclusion
Getting your thumb pick to fit right is the difference between fighting your hand and trusting it. Measure carefully, adjust the strap in small steps, mold with patience, and check your fit before every session. That routine builds the comfort and stability a Universal Picking Technique depends on.
Frequently Asked Questions
How do I know what size thumb pick I need?
Measure the circumference of your thumb at the knuckle using a soft tape measure or a strip of paper. Compare that measurement to the manufacturer's size chart. For Crossover thumb picks, the adjustable strap system fits a wide range of thumb sizes, so you can fine-tune the fit after choosing your starting size. If you are between sizes, size up and use the strap to tighten. A proper fit feels snug but never pinches.
How do I adjust a thumb pick strap for a better fit?
Slide the pick onto your thumb and tighten the adjustable strap until it feels secure but not tight. You should be able to wiggle your thumb slightly without the pick rotating. If the pick slips during downstrokes, tighten one more notch. If your thumb tingles or turns red, loosen it. The SharkTooth and Kodiak Crossover models both feature a fully adjustable thumb strap system, so you can dial in the tension for your playing style.
What is the difference between a standard thumb pick and a Crossover thumb pick?
A standard thumb pick is a single molded piece that wraps around your thumb and extends into a fixed blade. A Crossover thumb pick, like the SharkTooth and Kodiak models, uses an adjustable strap system that lets you control tension and, on SharkTooth models, insert your favorite flat pick. This makes it easier to switch between fingerstyle and flat-picking techniques without changing gear, which supports developing a Universal Picking Technique.
How do I prevent my thumb pick from slipping while playing?
Slippage usually means the fit is too loose or your thumb is sliding on a smooth surface. Tighten the adjustable strap until the pick stays in place during aggressive downstrokes and upstrokes. Clean the pick and your thumb to remove oils. If you use a molded pick, hot water molding can reshape it to match your thumb's contour. Crossover picks with adjustable straps give you more control over grip than fixed-size picks, which helps with stability during long sets.